
FLUX Kontext Quality: Blurry Output or Changed Detail?
Troubleshoot FLUX Kontext quality with actual output dimensions and portrait crops. Separate enlargement blur from changed glasses, stitching, and buttons.
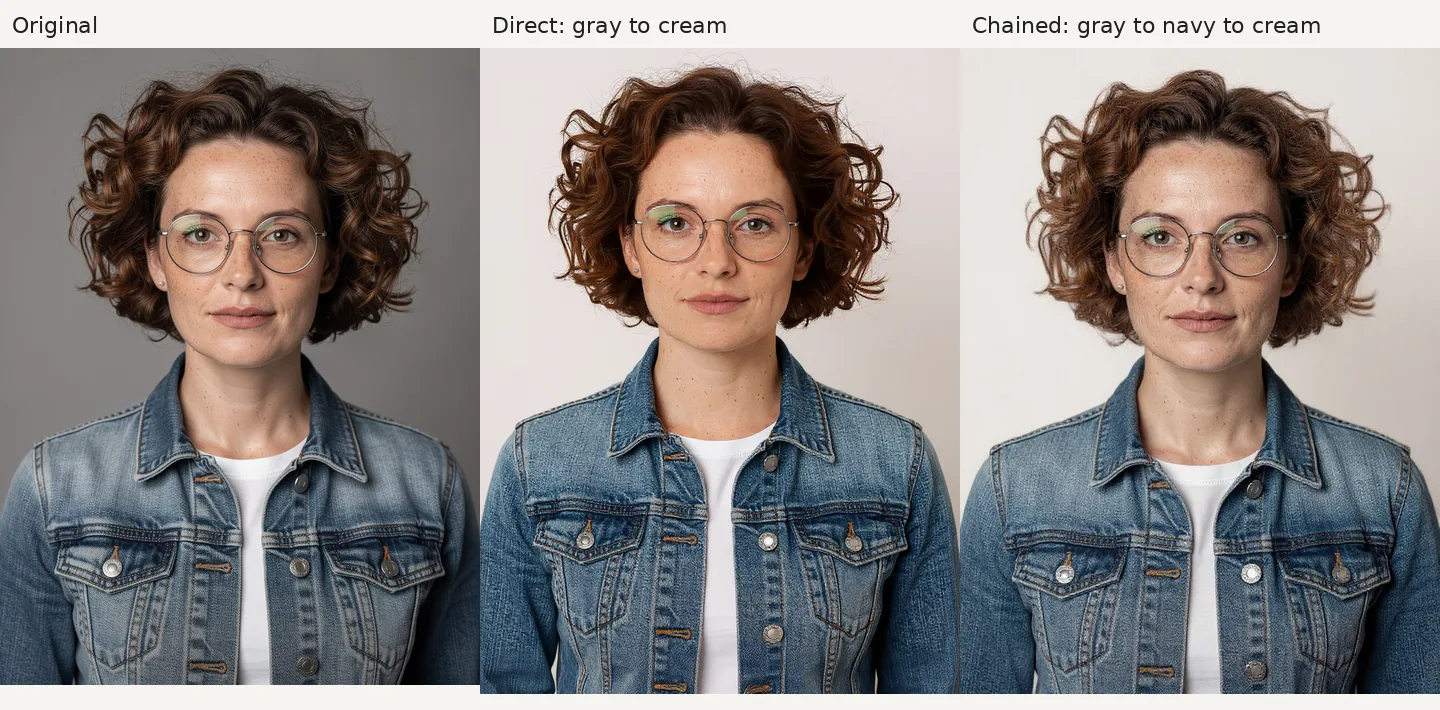
To troubleshoot FLUX Kontext quality, first check whether the downloaded image is blurry at its actual size or whether the edit changed details that remain sharp. More pixels can help a small image fit a larger layout; they cannot restore glasses or stitching that the model redrew. In the Kontext editor on flux-3image, select FLUX.1 Kontext [pro], upload one clear original, and describe the change plus the features to preserve.
Why does a Kontext download look soft when enlarged?
As of October 2026, BFL's Kontext editing parameters specify approximately one megapixel of output. “1K” does not mean every picture is 1024 × 1024: the dimensions depend on its shape. The portrait edits below are 880 × 1184 pixels, about 1.04 megapixels.
On flux-3image, Kontext [pro] and [max] both offer only the 1K tier and take one reference per edit. Switching to [max] does not add a 2K or 4K option.
Open the downloaded file at 100% zoom. Compare an eye, the glasses bridge, and a garment seam with the original at the same zoom. If the file looks clear there but soft when enlarged, its dimensions may be too small for your layout. If a seam is crisp but different, treat that as a preservation problem.
Does a second background edit lose more detail?
We generated a fictional adult portrait with FLUX.2 [pro]: short curly hair, round silver glasses, freckles, a denim jacket, and a gray studio backdrop. Each of the three Kontext [pro] requests below ran once, using one reference, default output sizing, and the instruction sent as written.
Direct edit, starting from the original:
Replace the gray studio backdrop with a plain cream studio wall. Keep the face, freckles, glasses, hair, denim jacket, pose, and lighting unchanged.
First step of the chained edit, also starting from the original:
Replace the gray studio backdrop with a plain navy studio wall. Keep the face, freckles, glasses, hair, denim jacket, pose, and lighting unchanged.
We then used the navy result as the reference and applied the same cream-wall instruction as the direct edit. That final instruction still says “gray,” although the uploaded background is navy. For your own edit, name the background actually shown in the upload.
Left: FLUX.2 [pro] original, 1K, 3:4, 880 × 1168 pixels. Center: direct FLUX.1 Kontext [pro] edit, 880 × 1184. Right: chained FLUX.1 Kontext [pro] edit, 880 × 1184. The navy intermediate was also 880 × 1184. No edit used an aspect-ratio override; these overview panels are reduced to equal widths.
Both final results replaced the background with a pale cream wall and kept the subject recognizable. The chained result showed no clear extra deterioration. One run per request cannot establish which approach preserves detail more reliably.
Which details changed despite the preservation instruction?
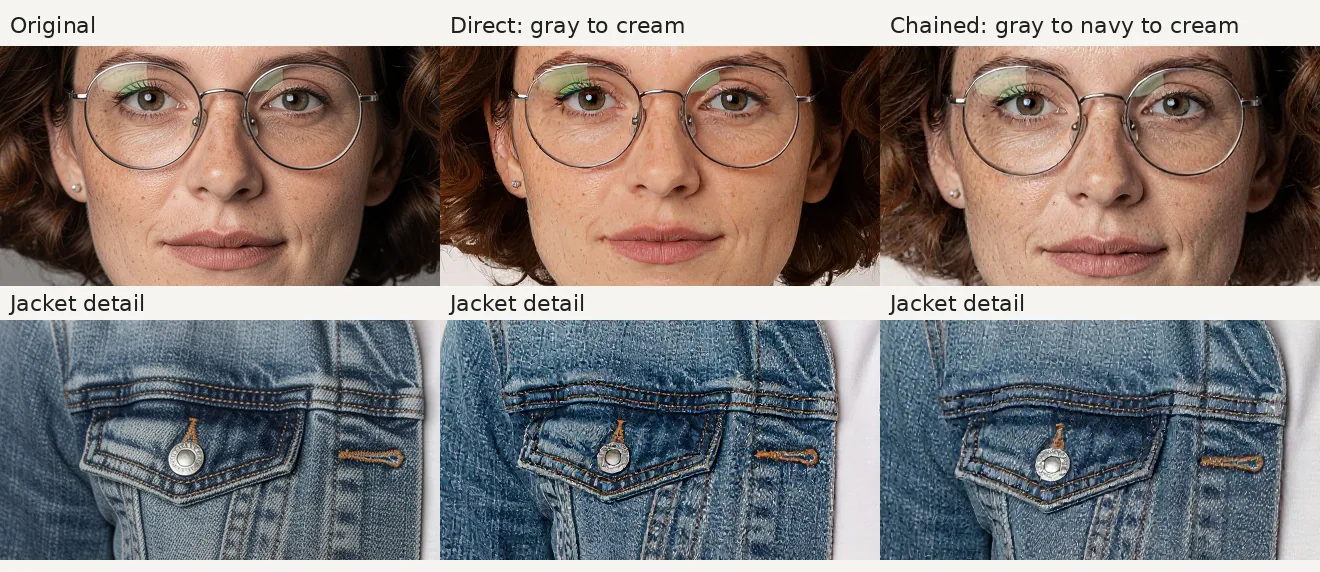
Columns: original, direct edit, chained edit. Top: glasses and skin detail. Bottom: denim pocket, stitching, and button. Each crop covers 440 × 240 source pixels, without resizing or sharpening; open the image at full size to compare. Crop positions follow the features as they shift.
The direct edit changes the glasses reflections and makes the hair lighter; both edits change the denim texture and pocket-button design. Neither final portrait shows severe facial blur, but “keep unchanged” did not preserve every detail.
A background edit can look successful at thumbnail size while changing a feature you need to retain. Check the button design and stitch pattern themselves, alongside sharpness.
What should you try for blur or changed features?
| Symptom | What to check | Next step |
|---|---|---|
| Only the page preview looks fuzzy | The downloaded file at 100% zoom | Judge the download before rerunning the edit. |
| The whole download becomes soft when enlarged | Its width and height versus the intended display size | Choose a larger-output model if the layout needs more pixels. |
| Glasses, freckles, or seams change while staying sharp | The corresponding feature in the original | Retry from the original with one requested change and explicit preservation instructions. |
| A later edit carries forward an unwanted change | The earliest saved result where it appears | Return to the original or an acceptable earlier result and request the final change. |
Returning to the original gives the model the original features to work from. Keep each download so you can compare retries, and choose the result that preserves the details you need. The prompt in this example already named the glasses, freckles, and jacket; a preservation sentence is a request, not an exact lock on those pixels.
For clothing edits, the Kontext garment examples show how to describe a replacement and the features to retain. For object removal, the mug-removal example shows why you should inspect the surrounding surface too.
If a tutorial recommends FP8 or FP4 settings, check which model it uses. NVIDIA's quantization discussion covers Kontext [dev] running on NVIDIA GPUs. Those precision settings are not controls in the hosted Kontext [pro] editor used here.
When should you choose a larger output?
If the edit looks right at native size but the layout needs a larger file, the FLUX 3 Image editor offers 1K, 2K, and 4K output as of October 2026. It accepts up to 10 reference images; Kontext takes one on this site.
Choose the output size for the space the image will occupy, then compare the generated face and small accessories with the reference. The examples here use Kontext [pro] at 1K. They do not show whether a different model would preserve this portrait more closely.